Cyberspace Tech
Download WiFi Kill PRO APK for Android to Penetrate WiFi Networks
Posted: Dec 2016
Recently, I’ve been trying some usefulsoftwares for penetrating WiFi networks and I’ve seen success in most of the tested programs. I was even shocked at the way most of these programs works, at least, having known their penetration pathway and loop holes, I know where and how to protect my WiFi networks against hackers.
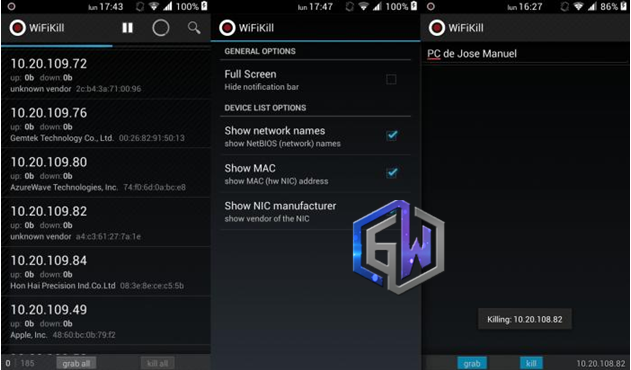
If you’re a PC user, you must have heard about Netcut which stops unauthorized persons from using our WiFi, what about mobile? Do you know that you can easily penetrate through your network and disable any other unauthorized users from making use of your network via mobile?
Introducing WiFi kill…
The WiFi Kill pro application is known to be a dangerous tools if on the hands of the wrong person, because same where you use the tools against others, same way the tool can be used against you. But you don’t need to worry, simply read the 3 ways to secure WiFi access on android and you’re safe.
Now, what WiFi kill does is to disable other connected device on same network and consumes the bandwidth to itself (that is, then penetrator consumes the bandwidth) gaining internet speed at max. However, the application also has the ability to show visited websites and traffic from the device disabled with some other info (compromised privacy which isn’t good at all) like network name., etc. The interface of the app is very friendly and with the help of this app, you get to view what people connected on same network surf on the internet and what they download.
App Name: WiFi Kill.apk
Price: Free
Android version: 4.0 and above
Malware scan: Certified
How to Install WiFi Kill Network Penetrator?
As known, the wifi kill is a download from a third party source (if yours isn’t downloaded from Playstore), so you’ll need to enable “unknown source”. To enable, go to Settings >> Security, scroll down and enable the unknown source option which enables you download apps outside Google playstore.
Read also:
How to Generate QR Code for WiFi Password and Share to FriendsHow to Locate Saved Wifi Passwords in Android[Latest] How to Crack Wi-Fi (WPA2 & WPS) with Kali Linux
Please be aware that Guruswizard.com only shares the free apk of this file without any modification on the app. Feel free to contact us if you encounter any difficulty. Also, don’t forget to share this app with your friends on social networks.


æ
How to unlock Bootloader, Install TWRP and Root Oneplus 3
Oneplus 3 android has been launched and made available on e-commerce stores. However, we managed to get the official custom recovery file for the device alongside the root file. With this, we can be able to install custom recovery by team win recovery project and then flash the SuperSU root file from recovery mode.

Before we can get to install the recovery and root files, there are protocols that we can’t skip, like unlocking the bootloader of the device. As known, oneplus devices do comes out of the box with a locked bootloader, so we can flash files on it only if we did unlock the bootloader of the device.
Don’t worry, you won’t regret any of this procedures… instead, it will benefit you and will be a big progress after success. As you’ll know the benefits of rooting your device and also the benefits you get from installing custom recovery file on your device. So, if you wish to take full control of your device, tweak dark ends of the device, flash custom roms and get some other tweaks via Xposed modules, then you’re highly advised to install custom recovery and root your device.
Recently, I published an article on how to make use of systemless Xposed on android devices, with that, no more worries on OTA updates and android pay, as it will function on your rooted device, but you’ll need to have installed custom recovery, before you flash the systemless SuperSU provided in the guide.
Today, I’ll quickly walk you through the process on how to unlock bootloader of your Oneplus 3, only then you can install custom recovery and finally root your device from recovery mode.
Warning: Please you’re highly advised to take nandroid backup of your recent rom and also make use of tools for file backup to backup your data, so if you skip any of the below procedure (which may risk your device) you’ll be able to recovery your device to normal state. Guruswizard isn’t responsible for any damages done on device, but I assure you success if all protocols are observed.
Note: You’ll need to first enable USB Debugging mode from the smartphone. To Enable USB debugging mode on OnePlus 3, simply go to settings >> developers option and enable from there. If the developers option isn’t visible, then go to about phone (under settings menu) and locate build number, and tap on it several times, till it notifies that you’re now a developer. This would enable developer’s option and connect your device to your computer.
How to unlock Bootloader on Oneplus 3 Android?
1. Firstly, setup ADB and Fastboot drivers on your Oneplus 3 device.
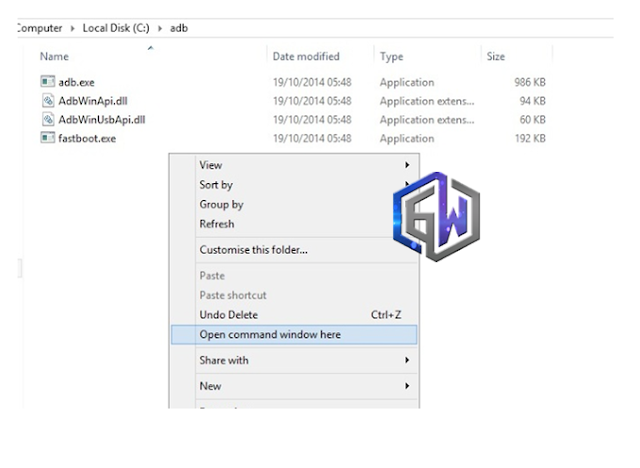
2. After that, open the ADB and fastboot program, launch command windows from the folder, to launch, simply click Shift + Right click and select “Open command windows here” as seen in the image below.
3. After that, input the below command and hit enter to enter fastboot/bootloader mode, as shown in the image below.
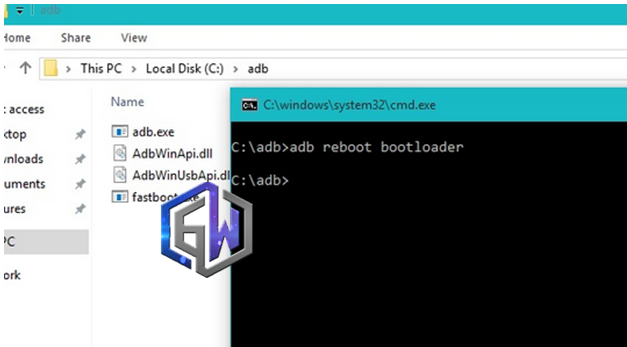
adb reboot bootloader
4. Next, input the below command to confirm if your device is connected to the computer
fastboot devices
5. After that, input the below command to unlock bootloader of your Oneplus 3 android
fastboot oem unlock
6. To verify if your bootloader is unlocked, input the below command and hit enter, if device tampered and device tampared unlock displays true as seen in the image below, then your bootloader is verified unlock.
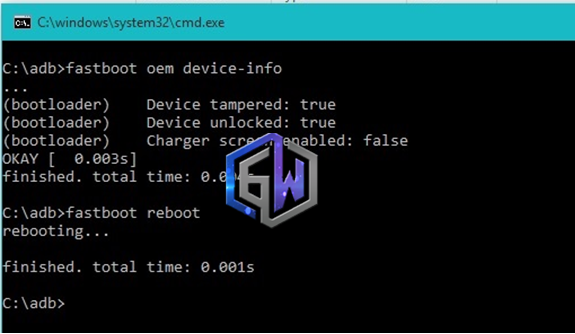
fastboot oem device-info
That’s it… bootloader of device has been unlocked successfully. The next action on our list is installation of custom recovery and rooting the device. You can close the command windows and reboot your device
How to Install TWRP 3.0.0 Recovery on Oneplus 3
1. Firstly, download the TWRP Recovery file here, and rename the image file to recovery.img.
2. After that, move the image file to the ADB and fastboot folder, because we’re going to flash the recovery file using command windows.
3. Boot your device to fastboot/bootloader mode, simply follow the step 2 &3 of the “unlock bootloader” guide to boot device to fastboot mode.
4. Next, run the below command to flash recovery file.
fastboot flash recovery recovery.img
5. Once you’ve flashed the file, simply input the below command to boot to recovery mode, which confirms you’ve flashed the file.
fastboot boot recovery.img
That’s it… getting to recovery mode is a sign of success. Next is rooting the device… you can disconnect your device from the PC now and reboot your device.
How to Root Oneplus 3 on Android 6.0.1 Marshmallow
You can choose to use systemless SuperSU to root, so as to install Systemless Xposed and continue receiving OTA updates and using Android pay, if you still wish to use the normal root method, then install the normal root file using the below procedure.
1. Firstly, download SuperSU file here and move the file to the root memory of your device (don’t move to a folder, just the root directory).
2. After that, boot your device to recovery mode using the Volume down + Power buttons together and wait till it boots to recovery mode.
3. Once you’ve boot your device to recovery mode, simply tap “install” locate for the SuperSU file mode on your device memory, select the file and install.
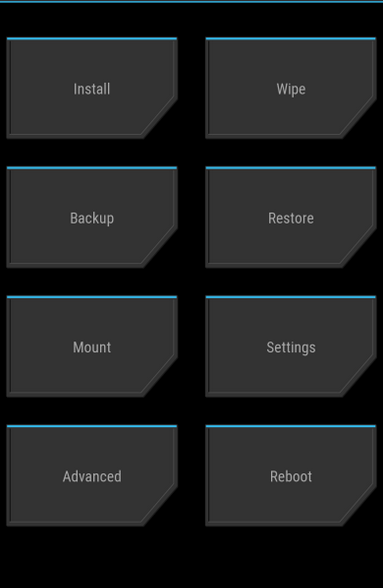
4. Once you’re done installing the file… then reboot your device and that’s it.
Read also:
How to Enable Blurred UI (LP) Feature on Android Phones5 Best Apps to Check Important Statistics on Android6 Best Android Custom ROMS for Rooted Oneplus 3 DeviceHow to Add Android N Quick Reply features on Lollipop and Marshmallow
Finally, your device is rooted. You can verify root using root checker to confirm if your device is rooted. If confirmed rooted, you can enjoy tweaks on your android, install Xposed framework with some lovely modules… if you encounter any difficulty executing any of the above, please do let me know via comment section.


 Google has released the first developer preview for Android 11, the next version of its mobile operating system. It’s the earliest Google has ever done a preview like this,
so the updates here aren’t that front-facing, but Google’s making some
big promises, like improved support for 5G, better privacy features, and
new messaging interfaces.


