Buying made cheap and easy

Thursday 29 December 2016

Airtel Latest Unlimited Free Surfing With N0.00kb via Psiphon, Queencee etc

Cyberspace Technology

Airtel Latest Unlimited Free Surfing With N0.00kb via Psiphon, Queencee etc

It has been a while that we have enjoyed Airtel free browsing tweak. I'm glad to inform you that Airtel free browsing and unlimited downloading is back and better, blazing very well via modded VPNs such as Sypon ShieldPsiphon Handler,Psiphon A+ ProQueencee, XP Psiphon, Pronet, Netify, UC Mini Handler etc.


The tweak is working flawlessly with the Airtel Sim card, it is good for unlimited downloading/streaming and it can be used to power all the apps on your Android smartphone. You can also enjoy it on your PC via tethering.

To enjoy the tweak, download any of the afformentioned VPN.

Take Note of This: Make sure you don't put any airtime on your Airtel sim, you must not be on any active data plan, also, clear your Psiphon or any other VPN data and cache.

Set your phone APN to the default. 

Then Launch your Psiphon or any other VPN, in the handler menu:
» Tick Remove Port
» Proxy Type: No Proxy
» Proxy Server: Airtellive.ng
» Real Proxy Server Type: Default
» Real Proxy Server: Leave it empty
» Real Proxy Port: 8080

» Select save and click on “tunnel whole device”.
» Click on the option tab
» Region: select, United States  

Go to MORE OPTIONS
» Check Connect through an HTTP Pro” then select “Use the following settings:” then configure as.
» Host address: 172.24.248.150
» Port:808 

Save and Click Connect.
Start surfing and enjoy your usual unlimited downloading/Streaming!

RecommendedMethods To Share/Tether Tunnel VPN Connection From Smartphone To PC And Other Devices 

 Stay Glued for the updates about fastest working and active Proxies.

Monday 26 December 2016

Jollific8 - New Glo Tariff Plan That Gives You 800% Value of Your Recharge Amount


CYBERSPACE

Jollific8 - New Glo Tariff Plan That Gives You 800% Value of Your Recharge Amount

Posted: Jul 2016

Hi guys, our beloved indigenous network, Globacom has here again with their usual fantabulous offer. Globacom has launched a new tariff plan called "Glo Jollific8”, it is specially designed to give new Globacom prepaid customers eight times more value on every recharge and the offer is not just limited to calling just GLO to GLO lines, but you get to call any other network!


Glo Jollific8 offers new subscribers, 800% more value on every recharge from N100 and above, as customers get octuplet benefits, including bonus to call all local networks, browse freely and get free data that can be gifted to other subscribers. It is similar to MTN StartPack of 500% bonus, but this is even better than the MTN StartPack, we all understand the difference between 500% and 800%. 

Benefit of Glo Jollific8

» Every recharge gives 8 times the value of what you recharge

» Every recharge comes with free data and free voice

» You can also choose to share free data with someone else via gift

Explanation

» N100 recharge, gives N800 airtime + 10MB

» N200 recharge, gives N1600+N100(25MB to gift)=N1700

» N500 recharge, gives N4000 + N200 (50MB to gift) =N4200

» N1000 recharge, gives N8k +N400 (100MB to gift)=N8400

» N5000 recharge, gives N40k + N2k (500MB to gift)=N42k


To Join Glo Jollific8 Tariff Plan
» Get a new Glo sim card
» Register and get it activated (you’ll automatically be on Jollific8 tariff plan) 

» Dial *123*Pin# and you are good to go.

» To check your data balance, dial #122# and fordata gifting, dial *606#

If you wish to enjoy long time talk with your loved ones, consider getting yourself a new Glo sim, register and activate it and you are automatically on the Glo Jollific8 tariff plan.

It seems Globacom has started repairing their poor network, if you have abandoned your Glo sim as a result of their poor network, kindly put it back in your phone to test their network. Please feed us back if Glo network is now stable in your area.

Delivery powered by Google Inc

How to Convert PDF Files to Word (.doc, docx) Format

Cyberspace Tech

How to Convert PDF Files to Word (.doc, docx) Format

Posted: Dec 2016

Portable Document formats aka PDF is an entirely different document from word (.doc, .docx) file formats. If you’ve tried opening pdf files on word application, you would notice that the text disappears and what displays on your word application is just some codes that looks very useless to user. So, if you think opening PDF files with word application or renaming the .pdf extension to .doc, .docx is the key, please re-think.


With the help of this file converter app I’ll be revealing, you got just 5 steps to follow on conversion process and gbam, you’re done. So, if you ever wanted to know the PDF to word conversionprocess, then this guide is your best shot. Don’t forget to read how to convert exe programs to apk.

So before I proceed, let me give you a sample of what I get before file conversion and after conversion when opening the pdf on word application. The no.1 image as described below is the non-converted pdf file launched on word application and the n0.2 is the converted pdf to word file launched on word application. You’ll notice trashy codes on first image and correct text on second image.


How to Convert PDF Files to Word (.doc, docx) Format

1.       Firstly, visit the PDF to word converter page and you’ll get to a window as displayed below.


2.       After that, hit the select file+button to select the PDF file you wish to convert to word document, as described in the image below.


3.       Once you’ve selected the file, open it and you’ll get a pop window; simply select the first option which is “following” as described in the image below.


4.       Next, click n the start button to begin conversion process. Conversion process would be started and you’ll see the progress on the progress bar as described in the image below.


5.       Once the PDF to word conversionprocess is completed, a download link to the converted file would be available, as seen in the image below.


6.       Hit the download button to download the word file, open the file and you’ll get the corresponding text on the PDF to the word. No more trashy codes.

NB: Remember to sign up on the page to get all the pages of the file converted.

That’s all on how to convert PDF to word (.doc .docx) file format. At least, you get to follow this method and can be executed on any device which includes your iPhone, iPad, iPod touch, android, windows phone, windows PC, Macbook or any other internet connected device that can get you to the page, with the files you wish to convert on it. Feel free to drop your comment and don’t forget to share this guide with friends, it might be very useful to most of them.


How to Install and Run Android 7.0 N (SDK) on PC

Cyberspace Tech

How to Install and Run Android 7.0 N (SDK) on PC

Posted:  Jun 2016

The Android N version hasn’t been fully outed on Android devices, as it’s still in beta mode. However, the developers preview is already outed for Nexus devices (released March 9th) and to only users who wish to experience bugs and some other cons on the Android 7.0 version and not just any Nexus regular user. We should expect the final release of Android 7.0 N on the 30th of September this year.


Features of Android 7.0 Version aka Android N

We managed to gather some information in regards to the features of the Android 7.0 version, as this was made known to those who already installed the developers preview version on their Nexus phones. Below are some features and expectation in the coming Android 7.0 version.

1.       Perfect multi-window mode. We’re going to be getting a split screen on compatible apps which can be easily opened side by side and also resized.

2.       Unlike the cons in android lollipop, this time, it’s stated that we’re going to be getting better tablet supports bring to tablet users a responsive design and very tablet-friendly interface. However, this would bring about real push for any tablet-optimized apps.

3.       What wowed me is the new Android N settings menu. Its kinda dope and some drop-down sections are included on the menu. Don’t want to say much on it, you can feed your eyes via the image below.


4.       Enhanced doze mode is included on the Android N version.

5.       The notification shade is revamped with quick settings panel.

6.       Large display size with faster app optimization.

7.       Recent app features with better multitasking experience.

8.       Better data saver mode – say no to high data consumption

9.       The dark mode is now enabled on Android N

10.   The call screening is cool with a perfect number blocking screen

11.   You can also get to fix emergency lock info on the screen on Android N version and many more.

OMG!!! I just feed you guys with most of the features to be outed on Android N version. Its cool having the preview version on your Nexus phone to know what’s coming. Anyways, thanks to android authority guys because that’s where I source most of the features.

Previously, I briefed you guys on how to install Android 6.0 Marshmallow on PC, toay, I’ll be your guide on how to easily install Android 7.0 N on windows PC, Linux or Mac OS. But please bear with me as I’m going to be using windows PC to experiment. Lolz… you just heard experiment, anyways, no risk is involved.

Minimum PC Requirements:

Windows PC – 2GB RAM, 400GB hard disk space, 1280 x 800 screen resolutions and any later windows operating system (XP, 7, 8, 8.1 or 10)

Mac OS X – same requirements as windows with Mac® OS X® 10.8.5 or higher

Linux – same requirements as windows with Ubuntu from version 8.04, GNOME or KDE desktop, GNU C Library (glibc) 2.15 or higher.

How to Install Android 7.0 N versions on PC

1.       Firstly, you’ll need to download Java JDK from here. The program enables you to run any Java related software like Android SDK.


2.       After that, download the Android SDK from here and install on your computer.


3.       Once you’ve installed the Android SDK, wait for it to launch and you’ll get these tools, and then simply check the box “Android N (API 23, N Preview)” as seen in the image below, and then scroll and click on Install packages. Remember to accept license


4.       After installation, simply go to Tools >> Manage AVDs and then click on Create.

5.       Simply create the AVD and installation of Android 7.0 N is completed. Next is how to run Android 7.0 operating system on our computer.

How to Run Android N version on PC

1.  Once you’ve created the Android Virtual Device (AVD), next is to run it on your computer.

2.  Simply launch the created AVD.

3.  After launch, wait for like 3-5seconds, and you’ll get to the Android N screen, as seen in the images below.


4.  That’s it. Android 7.0 N version installed and running perfectly on your computer.

That’s just it on how to install Android 7.0 N on windows PC/Laptop, Linux and Mac OS x. if you encounter any difficulty during the process, please do let me know via comment section.


Download WiFi Kill PRO APK for Android to Penetrate WiFi Networks

Cyberspace Tech

Download WiFi Kill PRO APK for Android to Penetrate WiFi Networks

Posted: Dec 2016

Recently, I’ve been trying some usefulsoftwares for penetrating WiFi networks and I’ve seen success in most of the tested programs. I was even shocked at the way most of these programs works, at least, having known their penetration pathway and loop holes, I know where and how to protect my WiFi networks against hackers.


If you’re a PC user, you must have heard about Netcut which stops unauthorized persons from using our WiFi, what about mobile? Do you know that you can easily penetrate through your network and disable any other unauthorized users from making use of your network via mobile?

Introducing WiFi kill…

The WiFi Kill pro application is known to be a dangerous tools if on the hands of the wrong person, because same where you use the tools against others, same way the tool can be used against you. But you don’t need to worry, simply read the 3 ways to secure WiFi access on android and you’re safe.

Now, what WiFi kill does is to disable other connected device on same network and consumes the bandwidth to itself (that is, then penetrator consumes the bandwidth) gaining internet speed at max. However, the application also has the ability to show visited websites and traffic from the device disabled with some other info (compromised privacy which isn’t good at all) like network name., etc. The interface of the app is very friendly and with the help of this app, you get to view what people connected on same network surf on the internet and what they download.

App Name: WiFi Kill.apk

Price: Free

Android version: 4.0 and above

Malware scan: Certified              

How to Install WiFi Kill Network Penetrator?

As known, the wifi kill is a download from a third party source (if yours isn’t downloaded from Playstore), so you’ll need to enable “unknown source”. To enable, go to Settings >> Security, scroll down and enable the unknown source option which enables you download apps outside Google playstore.

Read also:
How to Generate QR Code for WiFi Password and Share to FriendsHow to Locate Saved Wifi Passwords in Android[Latest] How to Crack Wi-Fi (WPA2 & WPS) with Kali Linux

Please be aware that Guruswizard.com only shares the free apk of this file without any modification on the app. Feel free to contact us if you encounter any difficulty. Also, don’t forget to share this app with your friends on social networks.


æ

How to unlock Bootloader, Install TWRP and Root Oneplus 3

Oneplus 3 android has been launched and made available on e-commerce stores. However, we managed to get the official custom recovery file for the device alongside the root file. With this, we can be able to install custom recovery by team win recovery project and then flash the SuperSU root file from recovery mode.


Before we can get to install the recovery and root files, there are protocols that we can’t skip, like unlocking the bootloader of the device. As known, oneplus devices do comes out of the box with a locked bootloader, so we can flash files on it only if we did unlock the bootloader of the device.

Don’t worry, you won’t regret any of this procedures… instead, it will benefit you and will be a big progress after success. As you’ll know the benefits of rooting your device and also the benefits you get from installing custom recovery file on your device. So, if you wish to take full control of your device, tweak dark ends of the device, flash custom roms and get some other tweaks via Xposed modules, then you’re highly advised to install custom recovery and root your device.

Recently, I published an article on how to make use of systemless Xposed on android devices, with that, no more worries on OTA updates and android pay, as it will function on your rooted device, but you’ll need to have installed custom recovery, before you flash the systemless SuperSU provided in the guide.

Today, I’ll quickly walk you through the process on how to unlock bootloader of your Oneplus 3, only then you can install custom recovery and finally root your device from recovery mode.

Warning: Please you’re highly advised to take nandroid backup of your recent rom and also make use of tools for file backup to backup your data, so if you skip any of the below procedure (which may risk your device) you’ll be able to recovery your device to normal state. Guruswizard isn’t responsible for any damages done on device, but I assure you success if all protocols are observed.

Note: You’ll need to first enable USB Debugging mode from the smartphone. To Enable USB debugging mode on OnePlus 3, simply go to settings >> developers option and enable from there. If the developers option isn’t visible, then go to about phone (under settings menu) and locate build number, and tap on it several times, till it notifies that you’re now a developer. This would enable developer’s option and connect your device to your computer.

How to unlock Bootloader on Oneplus 3 Android?

1.       Firstly, setup ADB and Fastboot drivers on your Oneplus 3 device.

2.       After that, open the ADB and fastboot program, launch command windows from the folder, to launch, simply click Shift + Right click and select “Open command windows here” as seen in the image below.


3.       After that, input the below command and hit enter to enter fastboot/bootloader mode, as shown in the image below.


adb reboot bootloader

4.       Next, input the below command to confirm if your device is connected to the computer

fastboot devices

5.       After that, input the below command to unlock bootloader of your Oneplus 3 android

fastboot oem unlock

6.       To verify if your bootloader is unlocked, input the below command and hit enter, if device tampered and device tampared unlock displays true as seen in the image below, then your bootloader is verified unlock.


fastboot oem device-info

That’s it… bootloader of device has been unlocked successfully. The next action on our list is installation of custom recovery and rooting the device. You can close the command windows and reboot your device

How to Install TWRP 3.0.0 Recovery on Oneplus 3

1.       Firstly, download the TWRP Recovery file here, and rename the image file to recovery.img.

2.       After that, move the image file to the ADB and fastboot folder, because we’re going to flash the recovery file using command windows.

3.       Boot your device to fastboot/bootloader mode, simply follow the step 2 &3 of the “unlock bootloader” guide to boot device to fastboot mode.

4.       Next, run the below command to flash recovery file.

fastboot flash recovery recovery.img

5.       Once you’ve flashed the file, simply input the below command to boot to recovery mode, which confirms you’ve flashed the file.

fastboot boot recovery.img

That’s it… getting to recovery mode is a sign of success. Next is rooting the device… you can disconnect your device from the PC now and reboot your device.

How to Root Oneplus 3 on Android 6.0.1 Marshmallow

You can choose to use systemless SuperSU to root, so as to install Systemless Xposed and continue receiving OTA updates and using Android pay, if you still wish to use the normal root method, then install the normal root file using the below procedure.

1.       Firstly, download SuperSU file here and move the file to the root memory of your device (don’t move to a folder, just the root directory).

2.       After that, boot your device to recovery mode using the Volume down + Power buttons together and wait till it boots to recovery mode.

3.       Once you’ve boot your device to recovery mode, simply tap “install” locate for the SuperSU file mode on your device memory, select the file and install.


4.       Once you’re done installing the file… then reboot your device and that’s it.

Read also:
How to Enable Blurred UI (LP) Feature on Android Phones5 Best Apps to Check Important Statistics on Android6 Best Android Custom ROMS for Rooted Oneplus 3 DeviceHow to Add Android N Quick Reply features on Lollipop and Marshmallow
Finally, your device is rooted. You can verify root using root checker to confirm if your device is rooted. If confirmed rooted, you can enjoy tweaks on your android, install Xposed framework with some lovely modules… if you encounter any difficulty executing any of the above, please do let me know via comment section.


NaijaMind: New Forum For Young Minds


NaijaMind: New Forum For Young Minds

Posted:Jun 2016

Hi guys, if you are looking for where to get valuable information on Web Programming Tutorial, Educational News, Library Science, Free Exams Expo, Gadgets Tech News, Mobile and PC Tech Tips and Browsing Tips, then you need to add NaijaMind.com to your reading list.


NaijaMind is a platform where you can meet webmasters that will help you archive your dreams online and also educate you on how to get approved Adsense account on your WordPress, blogger, wapka sites and YouTube without stress yourself at all, as well as putting you across on how to tweak your imei.

We have enough latest music and videos which you can download for you to chill your mind and we also have provision for you to post your articles which you want the world to know about, but you must be a registered member, SignUp now at www.naijamind.com/signup

For Unlimited free Browsing Tips, Relationship Tips, Jokes and Riddles, Sport News and Many More, log on to: www.naijamind.com

NaijaMind can be followed through:

Facebookhttps://www.facebook.com/naijaminders/

Twitterhttps://twitter.com/RabbiHarrison

How to Run Airtel 2GB and 6GB Plans on 3G Networks (Bypass 2G Network Limit)How to Play PC Games on Android, iPhone and Windows mobileGionee S6 Pro goes Official with 4GB RAM, see full Specifications

Cyberspace Tech

How to Run Airtel 2GB and 6GB Plans on 3G Networks (Bypass 2G Network Limit)How to Play PC Games on Android, iPhone and Windows mobileGionee S6 Pro goes Official with 4GB RAM, see full Specifications

How to Run Airtel 2GB and 6GB Pl

Posted:  Jun 2016

As known, Airtel released the cheapest data plans for internet users. The 6GB data which goes for N500 and the 2GB plan for N200. These plans would be on demand by most internet user, but the only limitation about this package is that you can only browse under 2G networks.


I’ve revealed subscription code for the New Airtel plan here, and most users are already mailing me on how they can easily bypass the 2G network limit on their devices. Right now, I got a working method on how the limitation can be lifted, and instead of browsing on 2G network, you can flex same package on 3G network.

The procedure I’m about revealing can be applicable on only rooted android devices. Please a moment of silence for iOS users... lolz don’t worry, I’ll still find a way to bypass the limitation on iPhone, so if you’re an iOS user, stay tuned or chech back on us later.

Of course, Rooted android phones, because we’re going to be doing little tweaking which requires root access, so if you haven’t rooted our android device, root it here. Once your android device is rooted, then you’re safe to implement the below procedure on your device.

What you need? Requirements

1.       3G/4G Speed Optimizer (Download here)

2.       Script manager (Download here)

3.       3G Turbo Script changer (Download here)

4.       Finally… your rooted android device

How to use the above requirements to bypass 2G network limit?

1.       Firstly, launch the 3G/4G speed optimizer

2.       After that, set the network speed to max, simply select 12/28/7

3.       Next, tick download speed increase and tap on “Apply tweak

4.       Once you’ve applied tweak, simply reboot your device to apply changes

5.       After that, launch the script manager app, download link provided above

6.       Next, locate the 3G turbo script changer txt file you downloaded. The name of the file is “3GTurboChanger_Installer_Updated_3_test_11.sh.txt

7.       After that, grant permission to Superuser (that’s if your device is rooted) and run the script

8.       Next, scroll up and make sure that settings is set to fastest so as you can get maximum 3G network connectivity on your device.

9.       Finally, reboot your android device.

Read also:
[Latest] Best Method to Save Network Data Usage on Android PhoneHow to Bypass Tweakware VPN Daily Limit for Unlimited Free BrowsingThe New Way to Locate a Saved WiFi Password on Android [No Root Required]

That’s all… once your device is rebooted; you can go to mobile network and switch to WCDMA Mode to enjoy data usage on 3G connectivity. There is an application, internet speed meter, it lets you monitor your internet speed on usage, download Internet speed monitor here and see how fast the airtel plan is on 3G network connection. If you encounter any difficulty during the process, please do let me know via comment section.


How to Play PC Games on Android, iPhone and Windows mobile

Gaming on PC is great, but everyone wants to get mobile and still enjoy most PC features in their mobile device. Things are getting better these days, as recent technology makes everything mobile and accessible in best experience.


Last time, I briefed you guys how to convert exe programs to apk format, and I’m pretty sure that those of you who followed the guide is already enjoying some exe programs on your android device. Today, I’ll show you how to run PC games on Android, iPhone and windows mobile.

By now, you should know that running android programs on PC is very easy, with the help of some emulators. You can even run iPhone apps on your computer. I’ve already published articles on that. So, next is how to reverse the case, which is, running PC games on mobile.

How to Play PC Games on Android, iPhone and Windows mobile

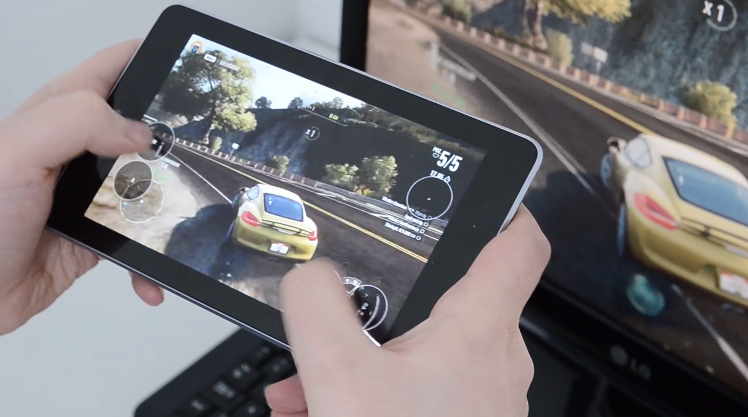
Actually, with the help of an app called remotr, we can easily remote PC games on our android, iPhone and windows phone device. So, the app makes it possible to play PC hames on android, iPhone and windows mobile. Apart from games, you can play stream through anything (no matter the quality) on your device, as long as it starts from the PC.

The Remotr program lets you stream high resolution and graphic intensive games straight to your tablet, android, iPhone, iPad or windows mobile. It also lets you play games using gesture for devices that comes with such functionality and some other pre-configured button presets; you can customize yours if you wish.

The good thing using this program is that the game stream rate is fast and responsive, it works smooth (no matter the android or mobile device you’re using, it’s all covered), lets you to connect multiple devices and the design of the program comes with smooth interface which makes it user-friendly.

How to make use of Remotr Program from PC and Mobile

1.       Firstly, download the “Remotr” program for your computer

2.       Install the program and create a new account with them from their website

3.       After that, download the remotr app for your mobile device; don’t worry download links for mobile app provided below.

4.       Login the created account on your mobile

5.       After that, select your computer and also the PC games you wish to run on your mobile

6.       Configure settings and you’re good to go.

Where to download Remotr for Mobile?

Download Remotr for iPhoneDownload Remotr for AndroidDownload Remotr for Windows phone

Read also
Cool Steps to Run Android Apps on your Windows SmartphoneHow to Get Google PlayStore Paid Apps for Free on AndroidHow to Install Paid Cydia Apps & Tweaks for Free

That’s it… once you’re done, you can begin gaming. You can also remotr the games on TV and enjoy your favorite PC games on TV. Hope this helps, if you encounter any difficulty implementing any of the above procedure, please do let me know via comment section.


Gionee S6 Pro goes Official with 4GB RAM, see full Specifications

Posted: 13 Jun 2016 01:14 PM PDT

Personally, I’ve anticipated the Gionee S6 pro device. However, speculations about the device was a trend during the past weeks, so I decided to hover low till these speculations are official confirmed, and it’s been made official already.


As known, the predecessor, Gionee S6 was released last November with a 5.5" 720p AMOLED display, runs on Lollipop operating system and powered by a MT6753 chip and 3GB RAM component, while the pro version, “Gionee S6 Pro” is coming with an upgrade in resolution, operating system, memory, processor and chipset.

The Gionee S6 Pro still maintains same 5.5 inches display but this time, it’s going to be featured with an IPS LCD capacitive touchscreen and 1080p resolution. The device runs on Android 6.0.1 marshmallow operating system and powered by a Mediatek MT6755 Helio P10 chipset, Quad-core processor with cortex-A53, varies in clock speed (1GHz and 1.8GHz), Mali-T860MP2 GPU coupled with a 4GB RAM component and 64GB internal storage. The device also accepts micro SD (SIM 2 Slot replacement) up to 256GB… crazy isn’t it?

At the back of the Gionee S6 Pro device is a 13MP rear camera with f/2.0, phase-detection autofocus and LED flash, below the camera is a fingerprint scanner having the Gionee trademark “G”. facing the device front is an 8MP camera and the camera software of the device features Geo-tagging, touch focus, face detection, panorama and HDR

In addition, the device is a dual sim device, and the second sim slot can be used as micro SD replacement… the device comes with 4G LTE capability, Wi-Fi 802.11 b/g/n, Wi-Fi Direct, hotspot functionality, Bluetooth v4.0 with A2DP and finally a Non-removable Li-Po 3130 mAh battery.

Overview of Gionee S6 Pro

5.5 inches, IPS LCD capacitive touchscreen

Android OS, v6.0.1 (Marshmallow)

Quad-core 1.8 GHz Cortex-A53 & quad-core 1.0 GHz Cortex-A53

64 GB internal storage, 4 GB RAM

13MP back, 8MP front camera

Fingerprint, accelerometer, gyro, proximity and compass sensors

Non-removable Li-Po 3130 mAh battery

Read also:
How to Root Gionee S6 Pro, Read thread6 Best Android Custom ROMS for Gionee S6 ProHow to Enable Blurred UI (LP) Feature on Gionee S6 Pro

The confirmed price tag of this device is $300. Seems to be affordable compared to some other brands of smartphones. I know of most device featuring similar components and still tagged at a far higher price. So the question is this, will you go for the Gionee S6 Pro?